Page 8 of 19

Re: Post your most obscure Ableton Live knowledge

Posted: Fri Aug 05, 2016 3:11 pm
by Shift Gorden
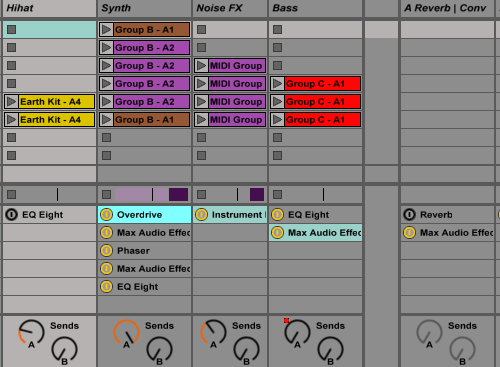
I LOVE this one: edit the options.txt file in Ableton's library folder. Add this:

-ShowDeviceSlots

Now, in Session view, using a new icon in the bottom right you'll be able to display each tracks effects right in mixer view. Very useful!

Image

Re: Post your most obscure Ableton Live knowledge

Posted: Thu Aug 11, 2016 4:30 pm
by silicon1138
wow - that's GREAT!

Re: Post your most obscure Ableton Live knowledge

Posted: Fri Aug 12, 2016 1:45 am
by Angstrom
this isn't massively obscure - but it's something I use every day. Oscillator feedback to create a kind of phase distortion synthesis in Operator.

Outcome: You can have a waveform in Operator which naturally morphs from a Sawtooth to a sine. Dependant on volume, and it can be modulated by the mod matrix.
Of course - a LPF effectively turns a Saw into a sine, but in this case you can have each operator independently doing its own shaping. It sounds a lot richer tonaly, it's more dynamic, and sounds more "analog" especially as the tuning will go slightly unstable on the low notes!

Well, try it. Use a LONG release on the amplitude to hear the waveshaping from saw to sine
Image

when the operator oscillators are all in parallel mode it activates the "feedback" parameter. The envelope shape, and the oscillator volume are crucial here. As the higher the volume the closer the wave-shape is to a saw. The outcome is a lot different to simply picking a saw waveform. Compare it for yourself. It's great for creating pads, and electric piano type sounds.

Additionally you can make PWM in Operator, that's a modulating square/pulse wave. I've explained how before, so I'll just re-share the link here http://angstromnoises.com/ableton-tutor ... -operator/

Re: Post your most obscure Ableton Live knowledge

Posted: Sat Sep 03, 2016 11:22 am
by Martin Gifford
(I don't know if this has been mentioned.)

As we all know, in Preferences you can save current set as default. But what some might not know is that this includes the ability to:

1) permanently set the zoom of the midi note ruler for each track.
2) permanently set the note ranges for each track.
3) permanently set the midi editor to full screen.
4) permanently set the default number of bars for each track.
5) permanently set the quantise for each track.
6) permanently enable the midi editor preview button for each track so that you can hear the notes as you enter them.
7) permanently set an initial track as record enabled.

For example, with my Bass track, the midi note ruler is permanently zoomed wide and ranged from C0 to C4, but for my Melody track, I have a narrower zoom and ranging from C3 to C6. For my Chord track, the default number of bars is four and the quantise is one bar so I can quickly enter a four bar chord progression. Then I can adjust the quantise to overlap bars or whatever as needed.

The benefit of stretching the midi editor up to be permanently full screen is that it becomes more creatively immersive and saves constant adjustment. You quickly get used to using the open close button or the keyboard shortcut to switch back and forth. Or you can program a mouse button for this.

Furthermore, you can have an initial music creation track loaded with a dance piano where the midi editor is fullscreen and zoomed so that you can fit in as much as possible. Then you can take Avicii's approach of creating bass, chords, melody, and fills all on one midi editor, then pull each line out to separate tracks. For me, this track is the one that is record enabled. So everything is instantly ready to go when I open a new project. Just load a drum loop, open the midi editor and start playing the piano or entering notes with the mouse.

Another thing I discovered just now, which I have wanted for ages: In the Drums category in the browser, there are two Selector kits. (Not sure if I added a pack or if it comes as a default.) :oops:

Re: Post your most obscure Ableton Live knowledge

Posted: Mon Sep 12, 2016 3:36 pm
by akm
"Set Song Start Time Here" as the locator or loop option.

I just recently discovered working with the locators and just highly recommend mapping the "set locator" and "jump to locator" to key binds. And that "Set Song Start Time Here" set in the locator or loop options let you always play the track from that place, despite any of your recent edits or selections - very useful for when editing the track. Ctrl+Space - overrides it to normal behavior, plays from what is selected.
Also mapping key-binds to the locators helps a lot for instant playback from a specific places.


Another one:
MIDI Editor > Alt-Click-Mouse Up/Down on the note(s) to change the velocity of that particular note(s). Too pity Ctrl does not help for fine adjustments.

Re: Post your most obscure Ableton Live knowledge

Posted: Wed Sep 14, 2016 8:03 pm
by Stromkraft
Martin Gifford wrote:
As we all know, in Preferences you can save current set as default. But what some might not know is that this includes the ability to:

1) permanently set the zoom of the midi note ruler for each track.
2) permanently set the note ranges for each track.
3) permanently set the midi editor to full screen.

This seems to be a fine and interesting tip and I applied it by making a clip with a different adapted grid per track of my template file (13 tracks). I then deleted the clips (not the tracks) before saving as my template.

Zoom and note ranges are indeed remembered per existing tracks, which is wonderful! Thank you! However, full screen does not seem to apply. Is there a specific modus operandi to make that stick?

Re: Post your most obscure Ableton Live knowledge

Posted: Sat Sep 17, 2016 12:10 pm
by Martin Gifford
Stromkraft wrote:full screen does not seem to apply. Is there a specific modus operandi to make that stick?
IIRC, You just:

Insert a midi clip into your midi track,
Open the midi clip,
Place the cursor at the top of the midi editor and drag it right to the top,
Resize your Note Ruler how you like it (you can hide Show/Hide Notes Box and Show/Hide Envelopes Box too, but not the Clip box.)
Click the Show/Hide Detail View button at the bottom right of the screen to get back to the Scene or session view.
Repeat the above steps for all your default midi tracks.
Turn off the Info View by pressing Shift + ?
Then click: Preferences > Files/Folder > Save current set as default.

Then only things left in midi editor window are one tool bar at the top, the status bar at the bottom, and the stupid Clip Box. Does this answer it? If not, I think you can set all new midi tracks to have full screen clips too. All my new midi track have full screen clips, but I'm not sure if that's from "Save current set as default" or if I used this method:

Add a new midi track,
Insert a midi clip,
Stretch the midi editor to the top of the screen.
Right click the track header
Select "Save as default MIDI track".

Then every new midi track should come with a midi clip that goes full screen... I think.

BTW, you can also set every default track (audio and midi) to have the Utility Audio Effect on it so that you can more quickly do volume automation and leave the mixer level adjustment free of automation when it comes to mixing.

Re: Post your most obscure Ableton Live knowledge

Posted: Mon Oct 17, 2016 6:42 am
by NoSonic822
backwards it means

EVIL NOTELBA :twisted:

Re: Post your most obscure Ableton Live knowledge

Posted: Mon Oct 17, 2016 7:58 am
by Idonotlikebroccoli
Martin Gifford wrote:BTW, you can also set every default track (audio and midi) to have the Utility Audio Effect on it so that you can more quickly do volume automation and leave the mixer level adjustment free of automation when it comes to mixing.
Utility doesn't go down to -inf dB, but an empty Audio Effect Rack does.

Re: Post your most obscure Ableton Live knowledge

Posted: Tue Oct 25, 2016 7:43 pm
by EasyWorkflow
If you go to top upper left hand corner, right next to the word tap, there is a number 120.00. If you type a new number instead of 120.00, the song will either speed up or slow down. That's cool. You really need to try this.

Re: Post your most obscure Ableton Live knowledge

Posted: Fri Nov 04, 2016 3:24 pm
by silversurfer60
EasyWorkflow wrote:If you go to top upper left hand corner, right next to the word tap, there is a number 120.00. If you type a new number instead of 120.00, the song will either speed up or slow down. That's cool. You really need to try this.
??????????????????

The number is the bpm of your song and you can set it to automation in the Masterchannel.

Re: Post your most obscure Ableton Live knowledge

Posted: Fri Nov 11, 2016 10:22 pm
by Fanu
Image

An often overlooked feature in Live is its "Second Window" feature, which allows you to have one view as the main view and the other in its own floating window. This allows for a floating mixer in a way.
Try it!

Re: Post your most obscure Ableton Live knowledge

Posted: Fri Nov 11, 2016 11:02 pm
by Tarekith
Can you resize that a little?

Re: Post your most obscure Ableton Live knowledge

Posted: Thu Nov 17, 2016 10:19 pm
by H20nly
Tarekith wrote:Can you resize that a little?
there's a way that we can assign images size attributes in the [img] tags when we post... but i can't for the life of me remember where it needs to go in the tag. :?:

Re: Post your most obscure Ableton Live knowledge

Posted: Thu Nov 17, 2016 10:43 pm
by fishmonkey
you can add width and height info:

http://www.bbcode.org/reference.php