Hi Folks,
I'm wanting to use Live on stage to trigger clips (effectively to fly-in audio) for multiple songs.
I'm using a small 12-step MIDI controller.
I have no trouble setting up triggered clips for a single song.
My issue is when trying to setup MIDI triggers for multiple songs (using Scenes)
I'm wanting to keep things as simple as possible.
I want to use the same 12 MIDI notes on the 12-step for each song (Don't want to change 12-step patches for each song).
When I set up the MIDI triggered clips in Live (for multiple songs), I can't restrict unwanted clips from playing.
All the clips I have assigned to say C1 (across multiple songs/Scenes) play each time I step on that note on the 12-step.
Is there a way to trigger clips in Live... where each Scene's samples are exclusive?
I'm sure this can be done... but I can't seem to figure it out.
Have Google searched for two days... and can't find relevant information.
Any help would be much appreciated!
To clarify, we aren't using a click-track.
All clips would be triggered manually via MIDI.
Thanks in advance!!
Trigger clips with MIDI - different samples per Scene?
-
Jim Roseberry
- Posts: 1
- Joined: Thu Jan 11, 2018 4:48 pm
Re: Trigger clips with MIDI - different samples per Scene?
Would also like to know if this is possible.
Anyone know if it's possible with Max?
Anyone know if it's possible with Max?
Re: Trigger clips with MIDI - different samples per Scene?
If you assign multiple clips/parameters to receive the exact same message, then there is no way for Live or any software to determine when you suddenly want them to ignore this specific message. So for the clips/parameters to act differently there has to be something that changes in that message along the way - even if it originates from the same place (the same step/control on your controller).
Off hand, I see two ways to perhaps approach this. I am not sure what you are using the 12 "steps" for exactly on your controller (if it's only to launch clips or also to control other things), but let us assume each step is to control 1 clip in a scene, for a total of 12 clips.
---------------------------------------------------
(1). Live does have a sort of exclusive MIDI assignment possible for clips in a scene - for a scene that is currently selected. If you open the MIDI Map Mode and you look under each track, there now will be a "play button" present (No. 4 in the image below). Instead of mapping your 12 steps to 12 clips, map your 12 steps to these 12 "play buttons". Exit Map Mode. Now whichever scene is selected, your 12 steps will control the 12 clips in that scene. If you select a different scene, the 12 steps will now control these 12 new clips.
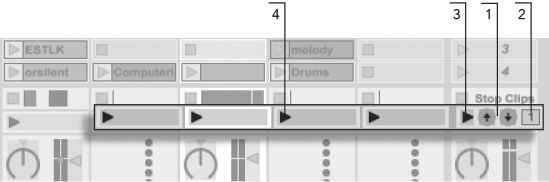
Now go back into MIDI Map Mode. Take a look at the master track. You see there are three controls there as well - Play, Up / Down arrows (No. 1,2,3 in the image above). You can assign controls here to play a scene that is selected and to scroll up or down to select different scenes. Exit MIDI Map Mode. Now you can select scenes with MIDI controls, play them, and/or play the clips in those selected scenes.
This way of course means that you will have to scroll between songs/scenes to select them.
---------------------------------------------------
(2) If you don't want to scroll around scenes, you could potentially do this with just MIDI assignments directly to clips, but then you will have to record a slightly different message for each set of clips and you will have to change MIDI channels on your controller (or use an app that can change those messages between the controller and Live).
To explain. MIDI has 16 channels that can be used to send MIDI message on. So if you have a maximum of 16 songs then this could work. For song no 1, you would set your MIDI controller to MIDI channel 1 and assign MIDI mappings of your 12 steps to 12 clips. You will see Live make the mappings something like 1/C1, 1/D1, etc. Now for song 2, you set your MIDI controller to MIDI channel 2 and assign the same 12 steps to the 12 clips now in song 2. You will see the mappings as 2/C1, 2/D1, etc. Song no 3, MIDI channel 3, and so on.
This way you use the same 12 steps, but you are sending a slightly different message because you are on a different channel each time. This of course means that you will have to change MIDI channels on your controller between each song.
---------------------------------------------------
So either scroll scenes, or change MIDI channels (or an app that can change those messages, but you will still need to send the app a message that you are changing songs) - you will still need to do something between songs to change the "scenario".
Off hand, I see two ways to perhaps approach this. I am not sure what you are using the 12 "steps" for exactly on your controller (if it's only to launch clips or also to control other things), but let us assume each step is to control 1 clip in a scene, for a total of 12 clips.
---------------------------------------------------
(1). Live does have a sort of exclusive MIDI assignment possible for clips in a scene - for a scene that is currently selected. If you open the MIDI Map Mode and you look under each track, there now will be a "play button" present (No. 4 in the image below). Instead of mapping your 12 steps to 12 clips, map your 12 steps to these 12 "play buttons". Exit Map Mode. Now whichever scene is selected, your 12 steps will control the 12 clips in that scene. If you select a different scene, the 12 steps will now control these 12 new clips.
Now go back into MIDI Map Mode. Take a look at the master track. You see there are three controls there as well - Play, Up / Down arrows (No. 1,2,3 in the image above). You can assign controls here to play a scene that is selected and to scroll up or down to select different scenes. Exit MIDI Map Mode. Now you can select scenes with MIDI controls, play them, and/or play the clips in those selected scenes.
This way of course means that you will have to scroll between songs/scenes to select them.
---------------------------------------------------
(2) If you don't want to scroll around scenes, you could potentially do this with just MIDI assignments directly to clips, but then you will have to record a slightly different message for each set of clips and you will have to change MIDI channels on your controller (or use an app that can change those messages between the controller and Live).
To explain. MIDI has 16 channels that can be used to send MIDI message on. So if you have a maximum of 16 songs then this could work. For song no 1, you would set your MIDI controller to MIDI channel 1 and assign MIDI mappings of your 12 steps to 12 clips. You will see Live make the mappings something like 1/C1, 1/D1, etc. Now for song 2, you set your MIDI controller to MIDI channel 2 and assign the same 12 steps to the 12 clips now in song 2. You will see the mappings as 2/C1, 2/D1, etc. Song no 3, MIDI channel 3, and so on.
This way you use the same 12 steps, but you are sending a slightly different message because you are on a different channel each time. This of course means that you will have to change MIDI channels on your controller between each song.
---------------------------------------------------
So either scroll scenes, or change MIDI channels (or an app that can change those messages, but you will still need to send the app a message that you are changing songs) - you will still need to do something between songs to change the "scenario".
Re: Trigger clips with MIDI - different samples per Scene?
You can go about this another way...if the sounds you're triggering are simply audio clips that you want to fire off and let play until they end...then....
1. Create a new MIDI track.
2. Set the MIDI Input to be the physical device that has the pads.
3. Select Monitor to IN so Ableton will always listen to the MIDI from that source.
4. Drop an instrument rack into the track.
5. Drop a sampler into the instrument rack.
6. On the sampler, click the Filter/Global modulation tab and change Loop to Trigger, and Release to 60 seconds.
7. In the Instrument Rack, click the Sampler you dropped into the rack.
8. Duplicate it for each song.
9. Rename each "Sampler" label to the name of the songs you're doing.
10. Click the chain button on the instrument rack.
11. In the zone editor, move each Sampler's zone into it's own slot, starting with 0, and ending at 127. (Potential 127 songs.)
12. Click the Map button in the Instrument Rack header.
13. Click the chain selector ruler.
14. Choose a macro button and click Map.
15. Change the MIN/MAX values in the Macro Mappings (upper left) to match the number of songs you have (i.e. 0 - 11).
16. Click the Map button again to turn off mapping.
You've just configured Ableton to address multiple samplers in one track, dependent upon the chain selection at any given time.
17. In the Instrument Rack, click the first Sampler.
18. Click the HIDE button next to the Chain button.
19. On the Sampler, you should still be seeing the Filter/Global tab. Click the Zone tab.
20. Click the KEY button in the Zone editor.
21. Drop all 12 samples for one of your songs into this sampler zone editor in the open section just under the Lin/Key/Vel/Sel buttons.
22. Select ALL of the samples (Click first sample, Shift-Click Last Sample).
23. Drag the left side of the key ranges to the little R (that stands for Root). Do the same with the right side of the key ranges. There should be 12 little boxes in the middle on C3 all with a little R in them. This ensures that the sample you're going to trigger is fired in the key it was recorded in. You can, if you wish, change the root of each sample to a different pitch in the RootKey field of the sampler for each sample in the zone editor.
24. For each sample, drag the entire key range box with the little R in it to the key that corresponds to the pad on your controller. If you don't know what it is, tap one of the keys and the keyboard in the zone editor will light up to show you.
25. Trigger each pad to hear each sample independently. Each sample will play from start to finish according to the Filter/Global Release time. If a sample is longer than 60 seconds...no idea what to do. Remember, your Filter/Global affects ALL samples in THIS sampler.
26. Now, click on the 2nd Sampler in the Instrument rack.
27. Repeat steps 21 - 25 for each sampler you dropped into the Instrument Rack.
28. Create a clip in the track in which you created this tangled web of samplers, on the scene that when triggered, will correspond to the song you're performing. I.E., if your entire song is on scene 1 ( in other words, you don't use scenes for song sections), then put this clip on Scene 1 in the track containing the instrument rack. If you DO divide your song into sections that correspond to scenes, then you have even more flexibility. You can adjust the Instrument Rack in the middle of a song to access specific samplers with specific collections of samples, changing on the fly, giving you more than just 12 options for one song, by adding another clip, mid-song.
29. Access the Envelope editor for the clip you just created.
30. Under Envelopes, select 'show all envelopes.'
31. In the first drop-down, select Instrument Rack.
33. In the second drop-down, select Chain Selector.
34. You have choices here. You can have this clip simply be a non-quantized triggered clip that fires immediately and sets the chain selector, OR, you can make this clip as long as your song, allowing you to automate the chain selection throughout the song to access other samplers in the Instrument Rack. For this example, just click the dotted line in the envelope editor so that the value is 0 across the entire clip.
35. Uncheck Loop on this clip.
36. Duplicate the clip (Command-D) Another one drops below the first.
37. Click the new clip and adjust the envelope value for Instrument Rack -> Chain Selector to a single line at value 1 for the entire clip.
38. Repeat for the other clips.
So what's happening?
Each clip adjusts the chain selector on the instrument rack effectively selecting which sampler is receiving MIDI input. For each sampler in the instrument rack, the key zone is set to only fire the ROOT sample on the KEY zone upon which it is located.
Test it out. Click the first scene play button in the master track. Fire your 12 pads individually.
Click the 2nd scene start button...fire the pads. They should be playing the samples from the 2nd sampler only.
If you'd like me to make a video of this process, I'd be happy to do so. Hope that helps. It keeps you from chewing up midi channels, which is another important point...
This device that triggers the samples should be on its own channel, or share channels with other devices provided those other devices never use the key range that you reserved for the pads (i.e. C2-B2 or some other 12-note range.) Any other device that transmits those notes on the same channel will also trigger whatever sampler is currently selected in the chain selector.
Have fun! This revolutionized how I automate groups of sounds for drums, sound effects, pads, etc.
Oh, one more thing. In each sampler, the Filter/Global Release Time only needs to be as long as the longest sample in that samples Zone editor...or a few milliseconds longer to ensure the entire sample plays when it's triggered.
MacBook Air | Ableton Live 9.7.5 2017-10-02 | Advance 61 Keybaord w/VIP 3.0 | Launchpad Mini | Scarlett Focusrite 18i8 | iPad Pro / OnSong | Allen & Heath QU-32
Re: Trigger clips with MIDI - different samples per Scene?
Jesus, thank you! Extremely helpful.