I know exactly what you're talking about - it's the same feeling I had when I was building my foosball table (here's the slightly off-topic pics and description for any interested parties). I'd love to spend that amount of time learning the electronics side and working away on it, but these days I've got 2 little kids and as such the amount of time for obsessing over personal projects is a tad restrictedAlexMC wrote:In regard to electronics experience; I had pretty much NONE before I started this project. I had to learn to solder (and solder VERY precisely!); I did a lot of research and tried many dead ends when figuring out how to attach the aftermarket footswitches to the keyboard controller card. The project occupied my thoughts almost constantly for weeks befre I had finished! But in the end the feeling of personal satisfaction was unbeatable... and I was glad I hadn't settled for less.
DIY Ableton foot controller build thread!
-
mcintosh_i
- Posts: 21
- Joined: Wed Nov 01, 2006 5:40 am
- Contact:
Re: DIY Ableton foot controller build thread!
Re: DIY Ableton foot controller build thread!
Bumpety bump.
I just got a LPK25 to replace my crappy nanoKey. As I don't feel like messing with glovepie, and as I'm rather uncomfortable with the idea of not being able to use my keyboard for typing at any time, I thought I could use the nanoKey as the core of a footcontroller.
After all, there are plenty of keys — 25, and you can just use 12 of them and use the octave + and - as bank changers. Plus, the thing is fully configurable with the editor, and can be used with a 5-meter long USB cable.
So I dismantled it to see what I could get out of it. Crappy little thing.

What I would like to do is use nice metal switches, but I need to figure how to connect them to the tracks of the PCB. Here's a shot of the thing:

Another shot of the contacts:

I 'll try to find which tracks to connect to produce a "note", leaving the velocity apart. This is a low-priority project, but I'll keep you informed if it turns out successfully.
I just got a LPK25 to replace my crappy nanoKey. As I don't feel like messing with glovepie, and as I'm rather uncomfortable with the idea of not being able to use my keyboard for typing at any time, I thought I could use the nanoKey as the core of a footcontroller.
After all, there are plenty of keys — 25, and you can just use 12 of them and use the octave + and - as bank changers. Plus, the thing is fully configurable with the editor, and can be used with a 5-meter long USB cable.
So I dismantled it to see what I could get out of it. Crappy little thing.
What I would like to do is use nice metal switches, but I need to figure how to connect them to the tracks of the PCB. Here's a shot of the thing:
Another shot of the contacts:
I 'll try to find which tracks to connect to produce a "note", leaving the velocity apart. This is a low-priority project, but I'll keep you informed if it turns out successfully.
'If they act too hip, you know they can’t play shit.'
-
chapelier fou
- Posts: 6021
- Joined: Mon May 15, 2006 12:15 pm
Re: DIY Ableton foot controller build thread!
Basically it just makes a connection between the inner circle and the outer circle in the PCB. So my guess is to solder one pin of your switch to the inner, and the other to the outer. You'll have to solder on the top of the pcb, or drill a hole in the track.
MacBook Pro 13" Retina i7 2.8 GHz OS 10.13, L10.0.1, M4L.
MacStudio M1Max 32Go OS 12.3.1
MacStudio M1Max 32Go OS 12.3.1
-
chapelier fou
- Posts: 6021
- Joined: Mon May 15, 2006 12:15 pm
Re: DIY Ableton foot controller build thread!
Huh, looking at the picture,what i said may be wrong. Have you tried making connections to see when the note is outputed?
MacBook Pro 13" Retina i7 2.8 GHz OS 10.13, L10.0.1, M4L.
MacStudio M1Max 32Go OS 12.3.1
MacStudio M1Max 32Go OS 12.3.1
Re: DIY Ableton foot controller build thread!
I've just done it. Here is a drawing of the tracks, for better understanding:

Nice, isn't it?
So, I just tried various combinations:
* when I press a thin metal sheet over the contact so as to connect red+orange+green at the same time, a note is output at full velocity.
* when I connect green+orange together, then connect red to them, a note is output, but it remains stuck when I disconnect red. Full sustain.
* same with red+orange together, stuck note when I connect green to them momentarily.
I couldn't test with red+green with momentary contact on orange, I have not the tools to test on such a little circuit.
But it seems that I won't be able to solder two tracks and use a switch to connect the third one to them, because of the 'stuck note' problem. Is there a solution, as a kind of footswitchswitch that can momentarily connect three tracks?
'If they act too hip, you know they can’t play shit.'
-
chapelier fou
- Posts: 6021
- Joined: Mon May 15, 2006 12:15 pm
Re: DIY Ableton foot controller build thread!
Have you tried all the (2+1)combinations ?
I mean link two tracks permanently and output the note with one contact ?
I mean link two tracks permanently and output the note with one contact ?
MacBook Pro 13" Retina i7 2.8 GHz OS 10.13, L10.0.1, M4L.
MacStudio M1Max 32Go OS 12.3.1
MacStudio M1Max 32Go OS 12.3.1
Re: DIY Ableton foot controller build thread!
Not all, that's what I explain here:
 I'll give it a try, but gosh, these little tracks are a pain to work on!
So, i couldn't test one (2+1) combination, and I have the unnerving feeling that this one would workGab wrote:* when I connect green+orange together, then connect red to them, a note is output, but it remains stuck when I disconnect red. Full sustain.
* same with red+orange together, stuck note when I connect green to them momentarily.
I couldn't test with red+green with momentary contact on orange, I have not the tools to test on such a little circuit.
'If they act too hip, you know they can’t play shit.'
Re: DIY Ableton foot controller build thread!
On this topic, this is a cross-post from another thread...i did this same shit but with a Nanokontrol and it works awesome.
http://fakemoneyproductions.blogspot.c ... n-at.html
I got the buttons on my last nanokontrol working with external buttons by attaching leads to the PCB with little globs of that fast-dry metal epoxy (very conductive). There's basically 4 connections; a +/- on the left and a +/- on the right (per button). So I cut the redundant traces with a file on the PCB so it wasn't constantly shorting out and it worked fine. That shit is waaaay fine for soldering though...
Re: DIY Ableton foot controller build thread!
Just to let you know it works really well. I have 2 of these that I use with the Keymap mode. I made a mistake at first in how I chose which keys to use but have solved it with and easy fix using the shift key on one of the controllers. Another issue was I had hoped to daisy chain the keyboards together but I get a 'not enough power' message so I end up using a powered USB hub.mcintosh_i wrote:And eleven seconds and one search later, this post here, I believe, is what you're referring to. Ta.
I chose this route of construction because I am useless with electronics but pretty good with building things. The form factor and size gives me no problems with the plungers and because I only so far use them inside my studio, the materials choices have been no problem. If you decide to go this route and need ideas etc. feel free to hit me up.
Cheers
iMac - 10.10.3 - Live 9 Suite - APC40 - Axiom 61 - TX81z - Firestudio Mobile - Focal Alpha 80's - Godin Session - Home made foot controller
Re: DIY Ableton foot controller build thread!
I'd guess it is as you suspect: Orange and red are for velocity sensing (hard strike: both get bridged, soft: only orange). As long as one of the two is bridged to something, the note sustains. It's probably some sort of fail-safe feature that makes it sustain even after the green is released, as long as red and green are still bridged, because normally they would only be bridged if the key is depressed and a released green (but bridged orange/red) would be an 'impossible' state.Gab wrote:I've just done it. Here is a drawing of the tracks, for better understanding:
Nice, isn't it?
So, I just tried various combinations:
* when I press a thin metal sheet over the contact so as to connect red+orange+green at the same time, a note is output at full velocity.
* when I connect green+orange together, then connect red to them, a note is output, but it remains stuck when I disconnect red. Full sustain.
* same with red+orange together, stuck note when I connect green to them momentarily.
I couldn't test with red+green with momentary contact on orange, I have not the tools to test on such a little circuit.
But it seems that I won't be able to solder two tracks and use a switch to connect the third one to them, because of the 'stuck note' problem. Is there a solution, as a kind of footswitchswitch that can momentarily connect three tracks?
What *should* output a note, but not at full velocity, is only green to orange. Have you tried using a needle on a wire or so to test this?
Also, have you traced the button traces to where they connect to the 'logic unit'? That's where I soldered mine on the PC dash. The traces themselves were on a thin piece of plastic, impossible to work with, but they were clamped onto a circuit board, and that's where I went. Drilled the holes with a small nail as a drill bit.
Just thinking out loud. Maybe you got it sorted by now.
Re: DIY Ableton foot controller build thread!
wasoota wrote:I'd guess it is as you suspect: Orange and red are for velocity sensing (hard strike: both get bridged, soft: only orange). As long as one of the two is bridged to something, the note sustains. It's probably some sort of fail-safe feature that makes it sustain even after the green is released, as long as red and green are still bridged, because normally they would only be bridged if the key is depressed and a released green (but bridged orange/red) would be an 'impossible' state.Gab wrote:I've just done it. Here is a drawing of the tracks, for better understanding:
Nice, isn't it?
So, I just tried various combinations:
* when I press a thin metal sheet over the contact so as to connect red+orange+green at the same time, a note is output at full velocity.
* when I connect green+orange together, then connect red to them, a note is output, but it remains stuck when I disconnect red. Full sustain.
* same with red+orange together, stuck note when I connect green to them momentarily.
I couldn't test with red+green with momentary contact on orange, I have not the tools to test on such a little circuit.
But it seems that I won't be able to solder two tracks and use a switch to connect the third one to them, because of the 'stuck note' problem. Is there a solution, as a kind of footswitchswitch that can momentarily connect three tracks?
What *should* output a note, but not at full velocity, is only green to orange. Have you tried using a needle on a wire or so to test this?
Also, have you traced the button traces to where they connect to the 'logic unit'? That's where I soldered mine on the PC dash. The traces themselves were on a thin piece of plastic, impossible to work with, but they were clamped onto a circuit board, and that's where I went. Drilled the holes with a small nail as a drill bit.
Just thinking out loud. Maybe you got it sorted by now.
i know when i messed with the older oxygen 8 keyboards, the two connections would establish velocity by timing. looking at the inside of the little rubber footy i think these work the same way. when you hit the note hard the outside and inside connections are hit almost simultaneously, but with a soft note the outer connection would happen first with a little more time before the inner connection. i know the old m-audio stuff worked this way, guessing these as well. i could be wrong.
Re: DIY Ableton foot controller build thread!
Probably right. I guess I was still thinking late-90s low-price feasibility.
So then you'd have to have green as the 'hot' lead and connect red and orange momentarily, the essential point in avoiding a stuck note being that red & orange mustn't remain bridged after you release their contact to green.
Of course simultaneous connection of green to red *and* orange will produce a note with infinite velocity and might rupture the space-time continuum, but it's worth the risk, IMO.
"They should have stopped when they were getting stuck notes..."
Re: DIY Ableton foot controller build thread!
So, I'm about to dive into this "idea". Question though....would it be possible (and I'm pretty sure it is, I only ask in case I'm missing something totally here) to create a MidiFighter style controller using a USB keyboard as the foundation and some arcade buttons?
Re: DIY Ableton foot controller build thread!
Absolutely not, but I was thinking again about recycling this nanokey these days, so your comments will certainly be helpful. Thankswasoota wrote:I'd guess it is as you suspect: Orange and red are for velocity sensing (hard strike: both get bridged, soft: only orange). As long as one of the two is bridged to something, the note sustains. It's probably some sort of fail-safe feature that makes it sustain even after the green is released, as long as red and green are still bridged, because normally they would only be bridged if the key is depressed and a released green (but bridged orange/red) would be an 'impossible' state.Gab wrote:I've just done it. Here is a drawing of the tracks, for better understanding:
Nice, isn't it?
So, I just tried various combinations:
* when I press a thin metal sheet over the contact so as to connect red+orange+green at the same time, a note is output at full velocity.
* when I connect green+orange together, then connect red to them, a note is output, but it remains stuck when I disconnect red. Full sustain.
* same with red+orange together, stuck note when I connect green to them momentarily.
I couldn't test with red+green with momentary contact on orange, I have not the tools to test on such a little circuit.
But it seems that I won't be able to solder two tracks and use a switch to connect the third one to them, because of the 'stuck note' problem. Is there a solution, as a kind of footswitchswitch that can momentarily connect three tracks?
What *should* output a note, but not at full velocity, is only green to orange. Have you tried using a needle on a wire or so to test this?
Also, have you traced the button traces to where they connect to the 'logic unit'? That's where I soldered mine on the PC dash. The traces themselves were on a thin piece of plastic, impossible to work with, but they were clamped onto a circuit board, and that's where I went. Drilled the holes with a small nail as a drill bit.
Just thinking out loud. Maybe you got it sorted by now.
'If they act too hip, you know they can’t play shit.'
Re: DIY Ableton foot controller build thread!
This thread deserves a bump!
I finally gave up on making a foot controller out of a nanoKontrol. I used a wireless keyboard instead, which I actually messed up half-way, but I succeeded in making it work as a foot controller.
I started with this, a 45€ 2.4GHz wireless keyboard (with a French layout, AZERTY) that I bought two years ago (and have replaced since).


The conductive traces are on a folded and glued plastic sheet that I had to separate carefully with a thin blade. Notice the ribbon cable that goes from the sheet to the PCB. I tested each key that I wanted to use with a multimeter (one probe on the trace on the sheet, another sweeping the connector on the PCB to find the corresponding terminal) and labelled them with a code to see to which combination of terminals each letter was associated (for instance, A: 8L 4R, 8th terminal from the left with 4th terminal from the right).
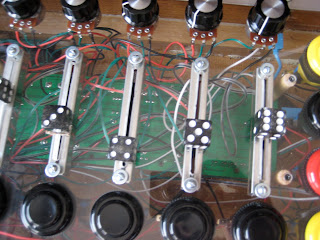
Then I messed up everything (the terminal connector especially) while trying to solder wires on the legs of the connector. For a moment I thought the project was over, but I managed to solder the wires directly on the PCB. Long story short — I got what I wanted and soldered enough wires to have 26 working combinations plus the caps lock key. I cut the wires that did not produce any combination. The result is ugly, but hey — it works!

I labelled the wires and taped them to a piece of aluminium so as to avoid tearing them accidentally from the PCB.

Then I taped the piece of aluminium to the PCB...

... and cut out the battery compartment from the keyboard (and added an on-off switch):

I re-tested everything again, and checked the wires combinations:

Then the layout. I initially planned to make a 4x5 switches controller and bought 20 switches, but finally ended up with a 4x6 layout. Not a problem, I'll add the remaining switches later — the upper row will be 1 2 3 4 7 Capslock. For the time being there will be only 19 switches, as I used one for another project.

Now the enclosure. I used 1cm MDF (3/8 inches). The board itself is 40cm wide, 25cm deep and 6.5cm high (16x10x2.5 inches). There is 7cm (3 inches) between each switch. It is not very refined inside, but it is rather strong.


And finally, after two hours of soldering...


The best thing is that it actually works! I may change the switches for sturdier ones later, but these ones will do for now. Thanks to all the contributors in this thread who inspired me!
I finally gave up on making a foot controller out of a nanoKontrol. I used a wireless keyboard instead, which I actually messed up half-way, but I succeeded in making it work as a foot controller.
I started with this, a 45€ 2.4GHz wireless keyboard (with a French layout, AZERTY) that I bought two years ago (and have replaced since).
The conductive traces are on a folded and glued plastic sheet that I had to separate carefully with a thin blade. Notice the ribbon cable that goes from the sheet to the PCB. I tested each key that I wanted to use with a multimeter (one probe on the trace on the sheet, another sweeping the connector on the PCB to find the corresponding terminal) and labelled them with a code to see to which combination of terminals each letter was associated (for instance, A: 8L 4R, 8th terminal from the left with 4th terminal from the right).
Then I messed up everything (the terminal connector especially) while trying to solder wires on the legs of the connector. For a moment I thought the project was over, but I managed to solder the wires directly on the PCB. Long story short — I got what I wanted and soldered enough wires to have 26 working combinations plus the caps lock key. I cut the wires that did not produce any combination. The result is ugly, but hey — it works!
I labelled the wires and taped them to a piece of aluminium so as to avoid tearing them accidentally from the PCB.
Then I taped the piece of aluminium to the PCB...
... and cut out the battery compartment from the keyboard (and added an on-off switch):
I re-tested everything again, and checked the wires combinations:
Then the layout. I initially planned to make a 4x5 switches controller and bought 20 switches, but finally ended up with a 4x6 layout. Not a problem, I'll add the remaining switches later — the upper row will be 1 2 3 4 7 Capslock. For the time being there will be only 19 switches, as I used one for another project.
Now the enclosure. I used 1cm MDF (3/8 inches). The board itself is 40cm wide, 25cm deep and 6.5cm high (16x10x2.5 inches). There is 7cm (3 inches) between each switch. It is not very refined inside, but it is rather strong.
And finally, after two hours of soldering...
The best thing is that it actually works!
'If they act too hip, you know they can’t play shit.'