DIY Ableton foot controller build thread!

Share your favorite Ableton Live tips, tricks, and techniques.
zeal
Posts: 11
Joined: Thu Apr 16, 2009 12:05 pm
Location: AUS
Contact:

Re: DIY Ableton foot controller build thread!

Post by zeal » Fri May 01, 2009 1:47 am

looking forward to seeing your controller.

for keystrokes to midi, bome's midi translator will definitely do the job.
you'd need the pro version which isn't free.
http://www.bome.com/midi/translator/

this looks like it'd work too... it's also not free...
http://www.musicunfolding.com/MU_MIDI_Controller.html

with a bit of fiddling pure data would do the job and that is free :D
http://puredata.info/

hope that helps.

have my first gig with my button box tonight. woot! :P

AlexMC
Posts: 62
Joined: Wed Aug 01, 2007 6:12 pm

Re: DIY Ableton foot controller build thread!

Post by AlexMC » Fri May 01, 2009 9:06 am

Glad that helped!

One other thing - when you mount your switches on your faceplate, *make sure* you have screwed a nut onto the thread BELOW the panel as well as above - this ensures you don't put strain on the switch where it joins the threaded section. I neglected to do this and managed to break 3 switches before I realised where I was going wrong!

TapedTogether
Posts: 4
Joined: Mon May 25, 2009 4:27 am

Re: DIY Ableton foot controller build thread!

Post by TapedTogether » Mon May 25, 2009 10:29 pm

I just wanted to express my thanks for the information and inspiration provided to help tackle one of these projects. This was for the most part my first foray into electronics (I caught the Instructables DIY bug bad! :roll:)

Anyways here's my version: 10 main buttons, with a Caps Lock Bank Changer and a Tap Tempo button, for a total of 12. I took apart an apple keyboard with two usb ports on the back for extra plugins (One of which is powering the LEDs). The apple keyboard was much more difficult to figure out and rejig because the plastic control sheets connect to the PCB by sliding into tiny terminals instead of being clamped down so you couldn't solder. I had to carefully cut out the different metal routes (were talking 1-2mm room for error) and tape the wires to them which then went into a block.

After the first round of getting everything soldered and hooked up, keys were auto outputting and I thought I had wired the pushbuttons incorrectly in my electrical ignorance, but it turned out I had accidentally bought a pack of N.C. (Normally Closed) buttons instead of N.O. (Normally Open), of course they were packaged in the exact same box. :wink:

Image

Image

Image

If you don't have any electrical experience but are interested in this kind of stuff, I definitely recommend you try taking up a project like this. I learned an incredible amount doing this with little to no prior experience.

Thanks again. :D

AlexMC
Posts: 62
Joined: Wed Aug 01, 2007 6:12 pm

Re: DIY Ableton foot controller build thread!

Post by AlexMC » Tue May 26, 2009 7:57 am

TapedTogether wrote:I just wanted to express my thanks for the information and inspiration provided to help tackle one of these projects. This was for the most part my first foray into electronics (I caught the Instructables DIY bug bad! :roll:)

Anyways here's my version: 10 main buttons, with a Caps Lock Bank Changer and a Tap Tempo button, for a total of 12. I took apart an apple keyboard with two usb ports on the back for extra plugins (One of which is powering the LEDs). The apple keyboard was much more difficult to figure out and rejig because the plastic control sheets connect to the PCB by sliding into tiny terminals instead of being clamped down so you couldn't solder. I had to carefully cut out the different metal routes (were talking 1-2mm room for error) and tape the wires to them which then went into a block.

After the first round of getting everything soldered and hooked up, keys were auto outputting and I thought I had wired the pushbuttons incorrectly in my electrical ignorance, but it turned out I had accidentally bought a pack of N.C. (Normally Closed) buttons instead of N.O. (Normally Open), of course they were packaged in the exact same box. :wink:

Image

Image

Image

If you don't have any electrical experience but are interested in this kind of stuff, I definitely recommend you try taking up a project like this. I learned an incredible amount doing this with little to no prior experience.

Thanks again. :D
Good job! I took apart a few keyboards in the making of my initial prototype, but never came across a keyboard with terminals instead of the clamp arrangment. Would be grateful if you could post pics of the PCB/terminals as it might be a better way of connecting for my next project!

Cheers
Alex

indiependente
Posts: 7
Joined: Thu Apr 23, 2009 1:16 pm

Re: DIY Ableton foot controller build thread!

Post by indiependente » Tue May 26, 2009 10:20 am

TapedTogether wrote:I just wanted to express my thanks for the information and inspiration provided to help tackle one of these projects. This was for the most part my first foray into electronics (I caught the Instructables DIY bug bad! :roll:)

Anyways here's my version: 10 main buttons, with a Caps Lock Bank Changer and a Tap Tempo button, for a total of 12. I took apart an apple keyboard with two usb ports on the back for extra plugins (One of which is powering the LEDs). The apple keyboard was much more difficult to figure out and rejig because the plastic control sheets connect to the PCB by sliding into tiny terminals instead of being clamped down so you couldn't solder. I had to carefully cut out the different metal routes (were talking 1-2mm room for error) and tape the wires to them which then went into a block.

After the first round of getting everything soldered and hooked up, keys were auto outputting and I thought I had wired the pushbuttons incorrectly in my electrical ignorance, but it turned out I had accidentally bought a pack of N.C. (Normally Closed) buttons instead of N.O. (Normally Open), of course they were packaged in the exact same box. :wink:

If you don't have any electrical experience but are interested in this kind of stuff, I definitely recommend you try taking up a project like this. I learned an incredible amount doing this with little to no prior experience.

Thanks again. :D

Congratulations on your project. Looks very good!

I'm on the process of building my own. For budget questions, I'm also planning on using those kind of buttons instead of the regular ones for use with the foot. But they don't seem hard enough. From your experience, are those you used robust enough? Do you think there's a chance of broking them when tapping with the foot (not kick them , just a tap :))?

Cheers

AlexMC
Posts: 62
Joined: Wed Aug 01, 2007 6:12 pm

Re: DIY Ableton foot controller build thread!

Post by AlexMC » Tue May 26, 2009 10:59 am

indiependente wrote:
TapedTogether wrote:I just wanted to express my thanks for the information and inspiration provided to help tackle one of these projects. This was for the most part my first foray into electronics (I caught the Instructables DIY bug bad! :roll:)

Anyways here's my version: 10 main buttons, with a Caps Lock Bank Changer and a Tap Tempo button, for a total of 12. I took apart an apple keyboard with two usb ports on the back for extra plugins (One of which is powering the LEDs). The apple keyboard was much more difficult to figure out and rejig because the plastic control sheets connect to the PCB by sliding into tiny terminals instead of being clamped down so you couldn't solder. I had to carefully cut out the different metal routes (were talking 1-2mm room for error) and tape the wires to them which then went into a block.

After the first round of getting everything soldered and hooked up, keys were auto outputting and I thought I had wired the pushbuttons incorrectly in my electrical ignorance, but it turned out I had accidentally bought a pack of N.C. (Normally Closed) buttons instead of N.O. (Normally Open), of course they were packaged in the exact same box. :wink:

If you don't have any electrical experience but are interested in this kind of stuff, I definitely recommend you try taking up a project like this. I learned an incredible amount doing this with little to no prior experience.

Thanks again. :D

Congratulations on your project. Looks very good!

I'm on the process of building my own. For budget questions, I'm also planning on using those kind of buttons instead of the regular ones for use with the foot. But they don't seem hard enough. From your experience, are those you used robust enough? Do you think there's a chance of broking them when tapping with the foot (not kick them , just a tap :))?

Cheers
I almost went for those cheap plastic switches when I built mine, but am glad I went for the robust version. It would be a total PITA to dismantle the whole thing to replace a switch...

TapedTogether
Posts: 4
Joined: Mon May 25, 2009 4:27 am

Re: DIY Ableton foot controller build thread!

Post by TapedTogether » Tue May 26, 2009 11:21 pm

Alex MC - Unfortunately the PCB is glued inside the box at this point, but here's a picture I found online of the same PCB (Ignore the red arrow):

Image

Basically I left the tabs plugged into the terminals (Which is what that hand in the picture is pushing the tab into), cut off the keyboard sheets so I was left with just the tabs and the metal lines, stripped them and taped wires to the different leads (in my case Top (Long) 1,2,3,4,5, and Bottom [1+2(which are ground/lead for the LED),3,7,9)

About the buttons -- I definitely went with the cheapos for budget/convenience's sake. They came 4 in a pack (2 red/2 black) for ~$3.75 at Radioshack.

First, the negatives: The build quality is not consistent. I checked and double checked that each button functioned correctly with each new connection I made. Some of the buttons feel great, while others feel a bit looser.
The major problem you need to watch out for is when soldering, the metal connectors are housed in a plastic casing - WHICH CAN MELT - the metal bits heat up and can move around the softened plastic if you apply any force. So just make sure you solder your connections as quickly as possible.

Positives: The buttons are very secure once screwed in with the provided bolt. Each button is responsive, and now having used and tested it for a couple days, I can say that I would trust using it live. You definitely would not want to step on them with all your weight, but if you're just tapping the buttons with your foot they're fine.

If you're on a budget, I'd say so long as you're not crazy on stage stomping on the buttons, then they will work fine - but if you have the money, go for a higher quality set of buttons.

Cheers :)

AlexMC
Posts: 62
Joined: Wed Aug 01, 2007 6:12 pm

Re: DIY Ableton foot controller build thread!

Post by AlexMC » Wed May 27, 2009 8:17 am

TapedTogether wrote:Alex MC - Unfortunately the PCB is glued inside the box at this point, but here's a picture I found online of the same PCB (Ignore the red arrow):

Image

Basically I left the tabs plugged into the terminals (Which is what that hand in the picture is pushing the tab into), cut off the keyboard sheets so I was left with just the tabs and the metal lines, stripped them and taped wires to the different leads (in my case Top (Long) 1,2,3,4,5, and Bottom [1+2(which are ground/lead for the LED),3,7,9)

About the buttons -- I definitely went with the cheapos for budget/convenience's sake. They came 4 in a pack (2 red/2 black) for ~$3.75 at Radioshack.

First, the negatives: The build quality is not consistent. I checked and double checked that each button functioned correctly with each new connection I made. Some of the buttons feel great, while others feel a bit looser.
The major problem you need to watch out for is when soldering, the metal connectors are housed in a plastic casing - WHICH CAN MELT - the metal bits heat up and can move around the softened plastic if you apply any force. So just make sure you solder your connections as quickly as possible.

Positives: The buttons are very secure once screwed in with the provided bolt. Each button is responsive, and now having used and tested it for a couple days, I can say that I would trust using it live. You definitely would not want to step on them with all your weight, but if you're just tapping the buttons with your foot they're fine.

If you're on a budget, I'd say so long as you're not crazy on stage stomping on the buttons, then they will work fine - but if you have the money, go for a higher quality set of buttons.

Cheers :)
Thanks for the info. Sure sounds tricky working with the stripped tracks (rather than being able to solder directly to the terminals). If you follow this link:

http://www.geocities.com/AirPanther/keyboard.htm

There's a section which seems to describe working with a PCB similar to yours:

"John Hastie from Australia provided a very helpful technique in which you remove the signal ports (the long and short slots that the transparent sheets were connected to) in order to allow the easy connection of your extension wires. To do this, flip the keyboard card over and locate the soldered pins directly beneath the long and short slots. Desolder all pins directly beneath the two slots, and remove the two connection slots. Then proceed to solder in your own extension wires as shown in figure E1-3c."

Any good in your situation?

MrShine
Posts: 137
Joined: Wed Apr 29, 2009 10:27 am

Re: DIY Ableton foot controller build thread!

Post by MrShine » Thu Jun 04, 2009 7:00 pm

Great thread, will look into building one of these to go with my old PC-in-a-turntable project i did a few years back :mrgreen:

rboswell
Posts: 3
Joined: Wed May 06, 2009 11:53 am

Re: DIY Ableton foot controller build thread!

Post by rboswell » Sun Jun 07, 2009 12:28 am

I actually tried first with an old mac keyboard that looks a lot like that one. it was too complicated, so i bought a twenty dollar keyboard from rdioshack.

Also I wanted to let everyone know that I think I found a much less difficult solderless solution. They make basically what you need in a screw in pcb for diy mame controllers. they're usually around 30 bucks, which isn't too bad, considering I paid 20 for a keyboard and had to put in a lot of extra work.

here is a link to one controller input i found.

http://www.ultimarc.com/ipac1.html

it uses usb, and has software, so you can hook the switched up and assign them to any key. I wish I'd known this before I finished mine, but my next project is a mame cabinet and when I saw this input i immediately thought of the footswitch.

ohrobot
Posts: 22
Joined: Sun Jul 29, 2007 8:24 pm

Re: DIY Ableton foot controller build thread!

Post by ohrobot » Wed Jun 24, 2009 7:29 pm

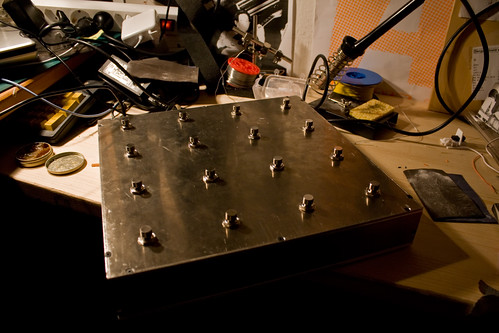
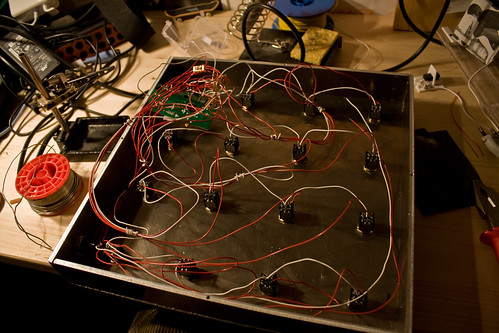
alright.. finally i am done with my first 4x4 footswitch prototype, mainly to control ableton live and reason drumpatterns while playing bass:

Image

Image
http://www.flickr.com/photos/fiesefalle/

by the way .. this is my band http://www.myspace.com/missueki i will use this thing live on july 10th :) ..

thanks to this thread for any help and inspiration!!

rboswell
Posts: 3
Joined: Wed May 06, 2009 11:53 am

Re: DIY Ableton foot controller build thread!

Post by rboswell » Sun Jul 05, 2009 2:35 am

I seem to be having a lot of trouble getting the whole 2 seperate keyboards thing working the way I'd like. I'm on a mac, and the osx version of bomes doesn't support keystroke input, but I don't think that would really help me anyways. I need a way to translate only the footswitch to midi, so it doesn't disable keys on my laptop. any ideas?

Und0
Posts: 2
Joined: Sun Dec 14, 2008 2:16 pm

Re: DIY Ableton foot controller build thread!

Post by Und0 » Tue Jul 14, 2009 12:08 pm

Thanks a lot for this thread: I've been thinking of doing this for years to replace my too large FCB1010 but didn't know where to start !
Will a PC keyboard work on a mac ?

Alejandro
Posts: 19
Joined: Fri Jul 04, 2008 4:56 pm

Re: DIY Ableton foot controller build thread!

Post by Alejandro » Wed Jul 29, 2009 8:59 pm

Sorry guys, but I definetely don't want to buy the incorrect comentary switches,
can anybody please confirm me which kind of comentary swithches will work:

I found a site with 6 options at an aproximate of $4 per unit.

1) 3PDT True Bypass Switch
2) RoHS 3PDT True Bypass Switch
3) 3PDT True-Bypass Footswitch
4) (E/H) 3PDT True Bypass Switch (RoHS)
5) DPDT Switch ( X-Wing )
6) DPDT Momentary Switch

All of the options come with 9 pins to solder the cables, except for the the two last options

I live in poor &%*& country, please help I have a one shot budget!!!

music is life!

Und0
Posts: 2
Joined: Sun Dec 14, 2008 2:16 pm

Re: DIY Ableton foot controller build thread!

Post by Und0 » Wed Jul 29, 2009 9:56 pm

Number 6.
I didn't build this foot controller yet (the parts are shipped but did not reached me yet) but I'm building guitar pedals fairly regularly so you can trust me. :wink:

Post Reply