With this setup you can use your Maschine software with or without the Maschine hardware (or other types of hardware! I have a super lightweight little USB drum pad thing that I use when I’m on the go!) either composing beat patterns in the Maschine software interface or in Ableton Live—or a combination.
Let’s get started by loading the Maschine 2 software as a plugin in a new, empty MIDI track. Then we can choose any drum (or instrument) kit we like. We want to set up the audio routing first. We’ll click on the Input/Output pane icon, next to where it says the name of the kit we just selected.
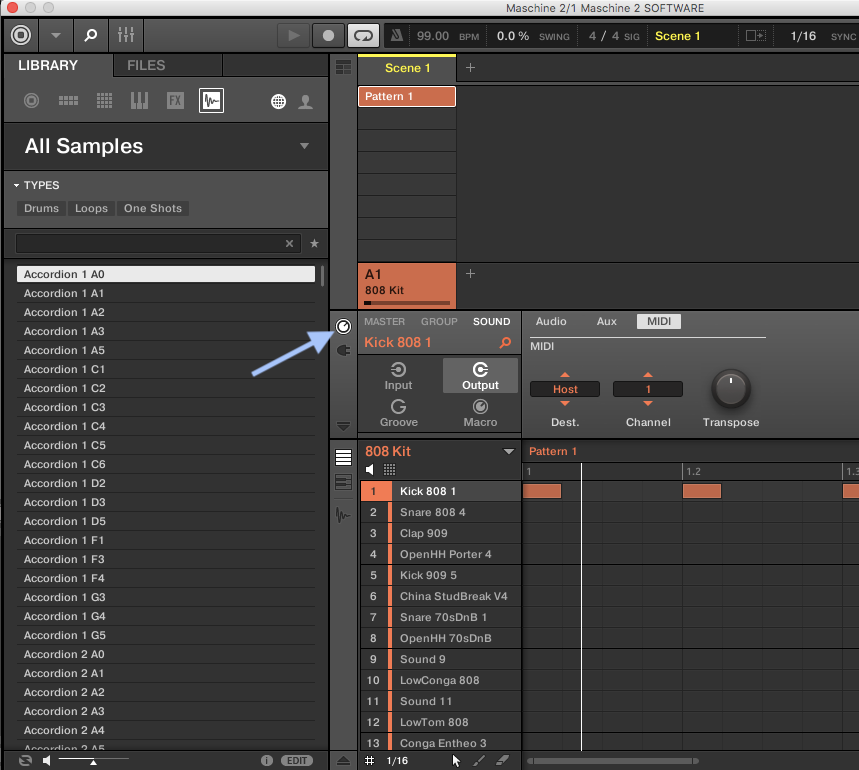
Where it says “Input” “Output” “Groove” and “Macro”, we select “Output”. Then, where it says “Audio” “Aux” and “MIDI”, we choose “Audio”. There’s a dropdown menu available here. By default, the audio routing for each sound is set to Group, but we want to set the first sound to go to Ext 2. The next sound will go to Ext 3, and the next to Ext 4, etc…
Apply this setting to each of the 16 sounds in your kit. The audio from each sound is now going to its own, separate channel, each of which we can later have Ableton receive individually.

While we’re in the Maschine plugin, we can set up the MIDI routing we want as well. Back under “Input” “Output” “Groove” and “Macro”, we will now select “Input”. Where it says “Audio” and “MIDI”, we choose “MIDI”. Under the “Source” dropdown, we choose “Host”. Then, for the first (topmost) sound in our kit, we’ll select channel 1. The next sound will be channel 2, all the way through to 16 for each of our remaining drum kit sounds.
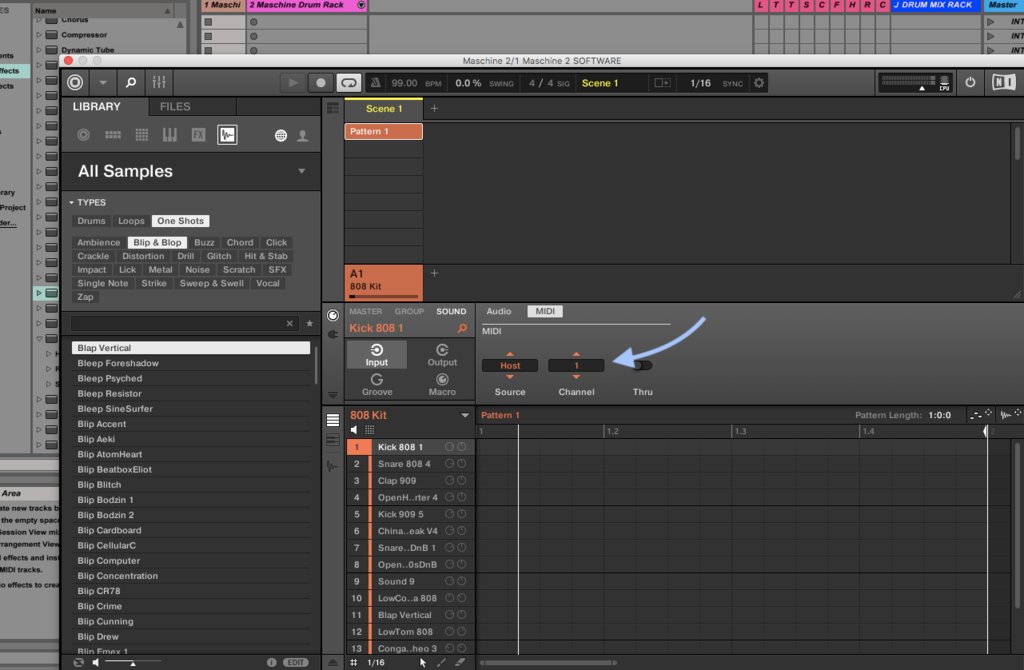
Now we can set up our Ableton drum kit. Create a new, empty MIDI track in Ableton. Drag in an empty Drum Rack from the Instruments list. This will have 16 empty cells. Into each one, drag an External Instrument from the Instruments list.
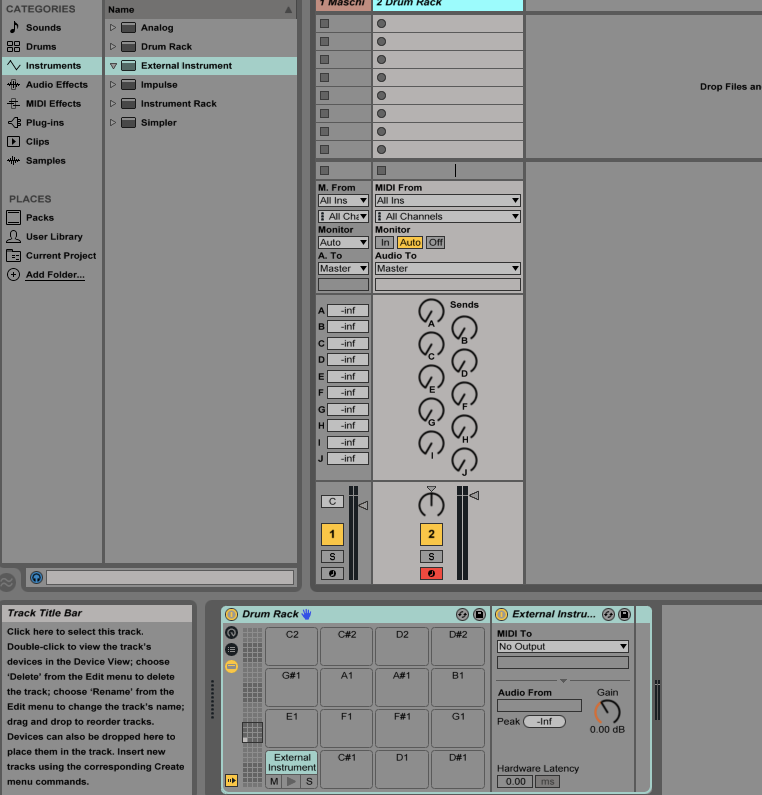
Each of the 16 drum slots will have its own external instrument. Name this Drum Rack something like Maschine Drum Rack, and for each of the 16 drum slots, assign a number that corresponds with the 16 sounds in the Maschine software (and the 16 pads on the Maschine hardware.)
Now click on drum slot #1 (bottom left) and to the right of our drum slots you’ll see two dropdown menus for “MIDI To” and one for “Audio From”. Click on the top dropdown menu for “MIDI To”, and select “1 Maschine 2 SOFTWARE”, then in the bottom dropdown menu for “MIDI To”, choose “1-Maschine 2”. This drum slot, when triggered, will send a MIDI message to the Maschine software’s MIDI Channel 1.

Simply continue the process for each of the remaining 15 drum slots, choosing “1 Maschine 2 SOFTWARE” and then “2-Maschine 2” for drum slot #2, “3-Maschine 2” for slot #3, etc.
Additionally, we want these drum slots to each receive their corresponding Maschine audio outputs separately. So drum slot #1 will send MIDI information to Maschine Sound 1 (usually a kick—if you’re using an 808 kit, for example, that sound will be called Kick 808 1). Then, when the sound is triggered, it will send the audio back to our drum kit, specifically to the individual, corresponding drum slot.
To make this happen, click on drum slot #1, and to the right, where it says “Audio From”, choose “3/4 Maschine” in the dropdown menu. (Don’t be confused, there is no “1/2 Maschine” option—don’t ask me why.)
Repeat this process for the remaining 15 drum slots: for drum slot #2, select “5/6 Maschine”, for drum slot #3, select “7/8 Maschine”, etc. You will notice that as you continue this process through to drum slots 15 and 16, you have run out of Audio From channels. Don’t be alarmed, it will still work. Just choose “31/32 Maschine” for both drum slots 15 and 16.
Now it’s time to test our setup. Create a drum pattern in Ableton, ideally using all sixteen drum slots so that we can check that everything works. Once you have something, hit play and watch the individual drum slots triggering (the yellow, sideways triangle will light up on each drum slot to indicate that it’s being triggered).
***It's worth mentioning that you will see here I have a limiter on this entire MIDI track. This is to avoid digital distortion from loud sounds coming from the Maschine software. I recommend adjusting the levels of each sound or using compression so as to avoid making the limiter work too hard. It's always nice to have some headroom with our levels so that later on we can crank things up a bit and get some punchy sound going.***

We want to make sure that for each of these drum slots that are playing notes, the corresponding sound in the Maschine software is being played. We will also check that each drum slot in our rack is receiving audio from the correct Maschine audio channel.
Let’s say you have an 808 kit loaded. Drum slot #1 in our drum rack should be triggering “Kick 808 1” in the Maschine software, and the audio from that kick sound should be coming back through to drum slot #1 via audio channel “3/4 Maschine”. When you click on drum slot #1, you can see a green audio level indicator in the Audio From menu whenever audio is coming through channel “3/4 Maschine”. In the previous image, we can see the same thing happening for drum slot #15, although in this case, the audio is coming in through channel “31/32 Maschine”.
Let’s enjoy the fruits of our labors. Click on the drum slot that’s triggering your snare sound. For an 808 kit, that would be drum slot #7. Go to the Audio Effects list and drag a reverb effect onto the snare drum slot. With your pattern playing, you will hear that the reverb only affects your snare sound!

Additionally, we can play with the level of each sound. Click on the “Show/Hide Chain List” button to the left of the drum rack.

We now see our drum slots arranged vertically, as well as in a grid. You now see the volume and pan settings for each drum sound, as well as mute and solo options (which can, of course, be mapped to pads/buttons if desired!)
In addition or as an alternative to dragging effects onto individual drum slots, we can set up miniature effects busses within our drum rack! So clean. Just click on the "Show/Hide Returns" button under the “Show/Hide Chain List” button, and then click on the "Show/Hide Sends Button".

Now, if we want our snare and our clap to both get some delay, we drag a delay effect into the box where it says "Drag Audio Effects Here" (I chose a Reverb effect, as you an see in the image above) and then under "Send-a" in the chain list, we drag the slider up and down to adjust the amount of signal being sent to that effect. One unfortunate limitation here, as compared to sending audio from a normal audio track to a normal bus, is that we don't seem to have the option to send audio to sends only. For this reason, even with the send volume cranked up all the way on a drum pad, we will hear the original, dry signal as well as the effect-processed signal. This can be slightly annoying in certain cases, but can be worked around by simply applying effects to individual drum pads as described earlier.
If you want to go even deeper, click the I/O button underneath the “Show/Hide Chain List” button and you’ll see some options for note routing. In a more complex scenario, this can be used to transpose MIDI to various scales, but there are far easier ways to do that. What I like here is the “Choke” option. With this, you can have a sound cut off another sound. For instance, your closed hat could cut off the open hat. This function can be performed within the Maschine software as well, but I prefer to do as much as possible within the Ableton software without opening the Maschine plugin window, as it helps to have everything more or less in one place.
An important closing note here is that once everything is set up, when you want to load a different kit in Maschine, you have to remember to turn off the routing presets for that kit, which by default will overwrite most of what we just did. It's easy, just click on the white, highlighted "Routing" button under the list of kits and with it greyed out, you can load the new kit while retaining your parameters.

If you save your Ableton project now, the configurations we just performed will all be saved with it, but I still recommend saving within the Maschine software as well. Name it something like "Maschine Ableton Routing".